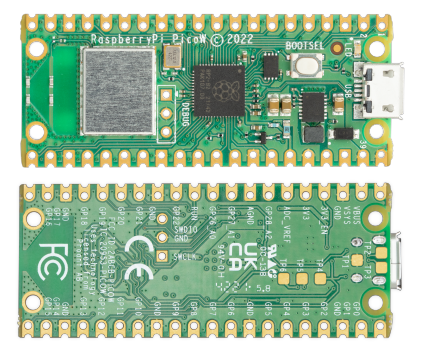
The Raspberry Pi Pico W is a low-cost, flexible development board based on the RP2040 microcontroller, now enhanced with Wi-Fi connectivity. This makes it an excellent choice for IoT applications, wireless communication, and remote monitoring. With built-in 2.4GHz Wi-Fi (802.11n and Bluetooth 5.2), the Pico W enables projects that require internet access, such as web servers, remote data logging, and real-time sensor monitoring. Also check out our blog: Raspberry PI has launched PICO-W.
The Raspberry Pi Pico W is powered by the RP2040 microcontroller, a dual-core Cortex M0+ running at up to 133MHz, designed for efficient yet high-performance computing. It features 264KB of SRAM and 2MB of onboard Flash storage, with support for Quad-SPI external flash with execute-in-place (XIP), enabling fast program execution.
One of the standout features of the Pico W is its wireless connectivity. It integrates the Infineon CYW43439 wireless chip, which supports 2.4GHz Wi-Fi (802.11n) and Bluetooth 5.2, including both Classic and Low Energy (LE) modes, making it ideal for IoT and wireless applications. With these capabilities, the Pico W is ideal for beginners and advanced users alike, whether you’re building a Wi-Fi-enabled sensor, a remote-controlled project, or experimenting with embedded systems.

					sudo apt update
sudo apt install cmake gcc-arm-none-eabi libnewlib-arm-none-eabi build-essential libstdc++-arm-none-eabi-newlib
Now that we have the necessary tools installed, the next step is to download the required repositories.
The pico-sdk provides the essential libraries and drivers to interface with the Raspberry Pi Pico W, while the pico-examples repository contains various sample programs that demonstrate how to use different features of the board.
Run the following commands to clone both repositories:
					git clone https://github.com/raspberrypi/pico-sdk
git clone https://github.com/raspberrypi/pico-examples
This will create two directories “pico-sdk” and “pico-examples” in your working folder. The SDK will serve as the foundation for building firmware, and the examples will help us quickly get started with development.
With the development environment set up, let’s build a simple example program to ensure everything is working correctly. We’ll build a simple Hello World example to understand step by step procedure. We will build pico-examples/hello_world/usb/hello_usb.c.
Before building, we need to define environment variables to specify the SDK location and board type. Run:
					export PICO_SDK_PATH=$PWD/pico-w_sdk
export PICO_BOARD=pico_w
To make these settings persistent across terminal sessions, add them to your ~/.bashrc or ~/.profile
Now, let’s compile a simple hello_usb program.
					cd pico-examples
mkdir build
cd build
cmake ..
make hello_usb
Once compilation is complete, the hello_usb directory will contain a .uf2 binary file. This file can be flashed onto the Pico W to enable USB output, verifying that the build process was successful.
RP2040 has an integrated USB1.1 PHY and controller which can be used in both device and host mode. The USB port can be used to access the USB bootloader (BOOTSEL mode) stored in the RP2040 boot ROM. It can also be used by user code, to access an external USB device or host. The on-board 2MB QSPI flash can be programmed using two convenient methods:
The easiest and most user-friendly method is USB mass storage mode. To reprogram the Pico W using this method:
This USB boot mode is hardcoded into the RP2040’s ROM, ensuring that it cannot be accidentally erased or modified.
					sudo apt update
sudo apt install build-essential pkg-config libusb-1.0-0-dev cmake
					git clone git@github.com:raspberrypi/picotool.git
cd picotool
sudo cp udev/99-picotool.rules /etc/udev/rules.d/
mkdir build
cd build
cmake ..
make
sudo make install
					$ picotool info
Program Information
 name:          blink
 web site:      https://github.com/raspberrypi/pico-examples/tree/HEAD/blink
 binary start:  0x10000000
 binary end:    0x10002058
The picotool info command displays details about the program currently flashed on the Raspberry Pi Pico W. In this case, the firmware is “blink”, a simple LED-blinking example from the Raspberry Pi Pico SDK. The output also shows the firmware’s memory range and a link to its source code.
					$ cd build
$ picotool load hello_world/usb/hello_usb.uf2
Loading into Flash:   [==============================]  100%
We will navigate to the build folder and load the hello_usb.uf2 firmware onto the Raspberry Pi Pico W using picotool. The progress bar confirms that the firmware has been successfully written to the device’s flash memory. You can verify it the code is uploaded using picotool.
					$ picotool info
Program Information
 name:          hello_usb
 web site:      https://github.com/raspberrypi/pico-examples/tree/HEAD/hello_world/usb
 features:      USB stdin / stdout
 binary start:  0x10000000
 binary end:    0x10005844
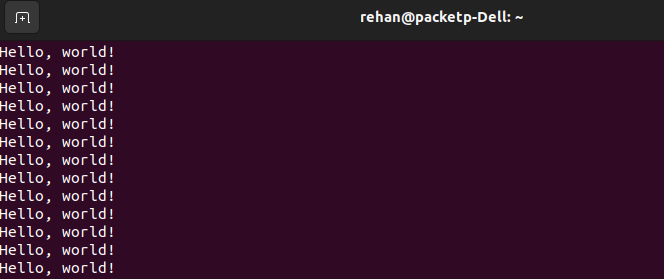
After successfully uploading the firmware, you may want to view the output from your Raspberry Pi Pico W. When running a program like hello_usb, the board sends messages via USB serial. On Linux systems, the Pico W typically appears as an emulated serial device, usually at /dev/ttyACM0. You can use any serial monitor tool, such as minicom or screen, to view the output. Once connected, you should see output similar to this:
