
Zephyr RTOS Bring-Up on the STM32F746G Discovery

Zephyr is a small, open-source real-time operating system built for resource-constrained embedded devices. It supplies the pieces that are easy to underestimate when starting from bare metal: a preemptive kernel, threads and synchronization primitives, interrupt handling, device drivers, logging, networking, and a build system that works consistently across many microcontroller families. The application can focus on its own behavior while Zephyr and the board support package handle the low-level integration.

That portability comes from a clean separation of concerns. The same Blinky application builds for many different boards because the board definition supplies the hardware-specific details — MCU, clock configuration, GPIO controller, LED alias, console — while three other layers do the rest of the work: West manages the workspace and build commands, Kconfig selects software features, and the device tree describes how the software maps onto physical hardware. Those four layers are exactly what this bring-up follows on the STM32F746G Discovery board.

This walkthrough sets up a Zephyr workspace (`pp_zep_ws1`), builds the stock Blinky sample, and uses the serial console and board documentation to confirm the board is actually working — not just compiling. The commands target Ubuntu, but the Zephyr concepts carry over to any supported host.
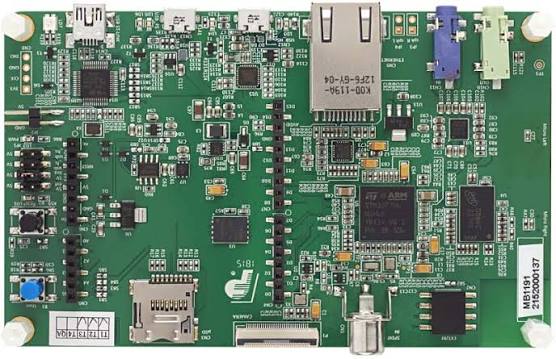
The board, at a glance

 
The STM32F746G Discovery is a Cortex-M7 board built around the STM32F746NG. Zephyr identifies it with the board name `stm32f746g_disco`. Its onboard ST-Link serves double duty as both the programmer/debugger and the bridge for a virtual serial port — so the first hardware detail matters: connect the USB cable to the ST-Link USB connector, not the board’s OTG or user USB connector
 
STM32F7 Discovery Board
Item Value
Board target
stm32f746g_disco
MCU
STM32F746NG (Cortex-M7)
User LED (LD1)
PI1
User button (B1)
PI11
Console UART
USART1, via ST-Link VCP
Typical serial device
/dev/ttyACM0
Console baud rate
115200

Keep this table handy — nearly every troubleshooting step below comes back to one of these rows.

Step 1: Install host prerequisites

This bring-up used Python 3.12 and CMake 3.28.0 or newer. Rather than trusting whatever the system happens to have, install the standard Zephyr prerequisites explicitly:

				
					sudo apt update
sudo apt install --no-install-recommends git cmake ninja-build gperf \
  ccache dfu-util device-tree-compiler wget python3-dev python3-venv \
  xz-utils file make gcc gcc-multilib g++-multilib libsdl2-dev libmagic1
				
			
Then confirm the versions that will actually be used, rather than assuming:
				
					python3 --version
cmake --version


The Python version matters because west and the Zephyr Python packages install into whichever interpreter’s environment is active. A dedicated virtual environment keeps that isolated from the rest of the system:

				
					python3.12 -m venv ~/pp_zep_ws1/.venv
source ~/pp_zep_ws1/.venv/bin/activate
python -m pip install --upgrade pip
python -m pip install west


 Step 2: Initialize the Zephyr workspace

 This is the step that actually creates the `pp_zep_ws1` workspace and pulls in Zephyr itself — it’s easy to skip past, but nothing after it works without it. `west init` sets up the workspace from a manifest, and `west update` fetches Zephyr and every module the manifest points to (HALs, drivers, third-party libraries):
				
					west init ~/pp_zep_ws1
cd ~/pp_zep_ws1
west update


 If `pp_zep_ws1` is tracking a custom manifest repository rather than upstream Zephyr, initialize it from that repo instead:

				
					west init -m <manifest-repo-url> ~/pp_zep_ws1
cd ~/pp_zep_ws1
west update
				
			
west update can take a while on the first run — it’s cloning the Zephyr tree plus every HAL and module the manifest references. Once it finishes, `pp_zep_ws1` contains the `zephyr/` application tree and its manifest-controlled modules, and west can resolve the Zephyr revision, SDK integration, and build metadata as one coherent set.

Step 3: Export the CMake package and install Python dependencies


Finish the host-side setup from the workspace root:
				
					west zephyr-export
west packages pip --install
				
			
  • Clone picotool repo and install picotool
				
					git clone git@github.com:raspberrypi/picotool.git
cd picotool
sudo cp udev/99-picotool.rules /etc/udev/rules.d/
mkdir build
cd build
cmake ..
make
sudo make install
				
			
west zephyr-export registers this Zephyr checkout with CMake’s package system, so `find_package(Zephyr)` in the build resolves to it. `west packages pip –install` installs the Python packages Zephyr’s build system depends on.

Step 4: Install the Zephyr SDK


The SDK provides the ARM cross-compiler and the tools needed to turn source into a firmware image for the board:
				
					cd ~/pp_zep_ws1/zephyr
west sdk install58


Step 5: Let Blinky prove the whole path


There’s no need to write any application code yet. Zephyr already includes the smallest useful hardware test in samples/basic/blinky. Build it explicitly for the Discovery board:
				
					cd ~/pp_zep_ws1/zephyr
west build -p always -b stm32f746g_disco samples/basic/blinky


`-b` selects the board definition, which supplies the MCU, clock setup, console, and LED alias the sample uses. `-p always` forces a pristine build — worth doing during bring-up, since stale Kconfig or device-tree output can otherwise make a real change look like it did nothing.

Flashing is a separate step. With the board connected via ST-Link:
				
					west flash
				
			
The expected result is wonderfully unglamorous: the user LED (PI1) starts blinking. If it does, the firmware has crossed the entire path — west, CMake, the ARM toolchain, the flash programmer, and finally a GPIO driver configured from Zephyr’s board description.
 

Step 6: Confirm the console with hello_world

A blinking LED confirms one output, but says nothing about whether the board’s other peripherals are wired up correctly. The next useful experiment is `hello_world`, built for the same target:
				
					west build -p always -b stm32f746g_disco samples/hello_world
west flash
				
			
The console comes out over the ST-Link’s virtual COM port, which the board routes to USART1. On Linux it typically shows up as `/dev/ttyACM0`:
				
					sudo apt install minicom
minicom -D /dev/ttyACM0 -b 115200
				
			
Expect something like:
				
					Hello World! arm


This small test changes the debugging conversation. If the LED works but nothing shows up in the terminal, the CPU and flash path are almost certainly fine — the problem lives somewhere in the USB connection, the serial device, permissions, baud rate, or the USART1 routing.

The four questions to ask when something doesn’t work


When a peripheral misbehaves, it’s more productive to walk through these four questions than to start editing application code:

1. Clocks — Is the peripheral’s clock enabled, and is the system clock configuration appropriate for the STM32F746?
2. Pins — Does the board schematic agree with Zephyr’s device-tree pin mapping? The LED must resolve to PI1, and the console must resolve to the USART1 pins routed through ST-Link.
3. Console — Is the ST-Link VCP connected, is the right /dev/ttyACM* device open, and is the terminal set to 115200 baud?
4. Build configuration — Did Kconfig and the device tree actually describe the feature the application expects? `prj.conf` controls software configuration; board files and overlays describe the hardware.

Zephyr’s board definition, Kconfig, device tree, and drivers form a chain, and a failure at any one link is much easier to localize when each is tested separately — which is exactly what Blinky and `hello_world` do.
 

Troubleshooting reference

Symptiom Likely cause What to check?
Build fails to find the SDK
SDK not installed or `ZEPHYR_SDK_INSTALL_DIR` unset
Re-run `west sdk install`; Check the environment variable if you installed it manually
`west flash` can’t find the board
ST-Link not detected, wrong USB port, permissions
`lsusb` should show an STMicroelectronics ST-Link; confirm the cable is in the ST-Link port, not the OTG/user port
Flash succeeds but default runner fails
Runner/debug-probe mismatch
Try `west flash –runner openocd`
No `/dev/ttyACM*` device appears
udev/group permissions, or board not enumerating
dmesg \| grep tty` to see what appeared on connect; add the user to `dialout` (see below)
Serial port opens but shows nothing
Wrong baud rate, wrong device, or console not routed to USART1
Confirm 115200 baud and `/dev/ttyACM0`; re-check the board’s console mapping in the device tree
Permission denied opening the serial/debug device
User not in the right group
Add the user to `dialout`, then log out and back in
If `lsusb` doesn’t show the ST-Link at all, it’s a physical or driver problem before it’s ever a firmware problem — worth ruling out first.

Fix serial/debugger permission issues by adding the current user to `dialout`:
				
					sudo usermod -aG dialout "$USER"
				
			
If the default flash runner doesn’t cooperate, OpenOCD is a solid fallback:
				
					west flash --runner openocd
				
			
And when it’s unclear what device actually showed up, ask the kernel directly:
				
					dmesg | grep tty
				
			
These checks look mundane, but they head off a very common embedded-development mistake: debugging firmware when the host was never actually talking to the board.

A quick look at debugging, not just flashing


Once Blinky is reliable, it’s worth confirming the debug path too, since it’s what you’ll actually use once application code gets more complex than blinking an LED:
				
					west debug
				
			
This launches GDB attached to the target through the same ST-Link connection `west flash` used, and is the natural next step once printf-style debugging via the console stops being enough.

Where the first blink leads


Once Blinky and `hello_world` are reliable, the next experiments can be deliberately small: try `samples/basic/button` (using the user button on PI11), inspect `samples/drivers/gpio`, or move on to I2C and SPI. Change the blink rate, enable Zephyr logging, and eventually create a project with its own `prj.conf` and device-tree overlay. Each change should answer a specific hardware question, not just add more code.

The real lesson from a bring-up like this is that the LED is an entry point, not the destination. It establishes a known-good toolchain, workspace, flash path, clock configuration, pin mapping, and GPIO driver. From there, understanding the rest of the STM32F746G Discovery board — button, UART, I2C, SPI, display — is a matter of following those same four layers out to each new peripheral.
Facebook
Twitter
LinkedIn
Email

Recent Posts

Leave a Reply

Your email address will not be published. Required fields are marked *

Table Header Table Header Table Header Table Header
Content
Content
Content
Content